


วิธีติดตั้งชุดหน้าปัดดิจิทัล Audi A6 C7 (2012-2018)
คู่มือการติดตั้งหน้าปัดดิจิทัล Audi A6 C7 (2012–2018)
คู่มือนี้แสดงเส้นทางการติดตั้งที่บันทึกไว้สำหรับ มาตรวัดดิจิทัล Audi A6 C7 บน 2012–2018 Audi A6 C7. งานนี้ไม่ใช่แค่การสลับ จอแสดงผลเท่านั้น: มาตรวัดเดิมจะถูกถอดออก เปิดบน แท่นทดสอบ ชิ้นส่วนอิเล็กทรอนิกส์ดั้งเดิมที่จำเป็นจะถูกเก็บไว้ และมาตรวัด LCD ใหม่จะถูกทดสอบก่อนที่จะปิดแผงแดชบอร์ด.
การติดตั้งนี้เป็นไปตามเส้นทางการเชื่อมต่อเดิมของรถและไม่ จำเป็นต้องตัดชุดสายไฟจากโรงงานใน การติดตั้งที่บันทึกไว้ อย่างไรก็ตาม มัน ไม่ใช่การติดตั้งที่ไม่ต้องถอดชิ้นส่วนใดๆ. การถอดแผง แดชบอร์ด การถอดมาตรวัดเดิม และการถ่ายโอนชิ้นส่วนภายใน เป็นส่วนหนึ่งของขั้นตอนการติดตั้ง.
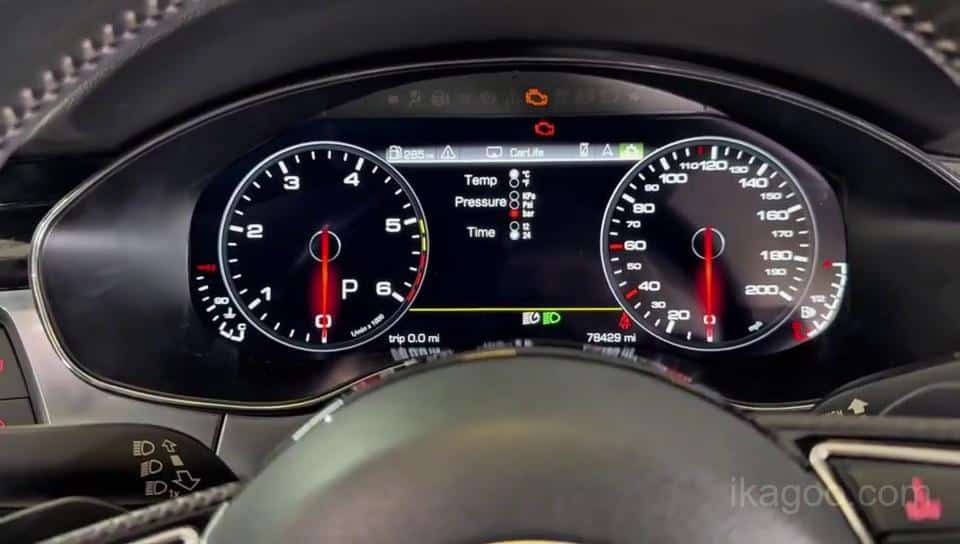
สิ่งที่เส้นทางการติดตั้ง Audi A6 C7 นี้ครอบคลุมจริงๆ
ขั้นตอนนี้เป็นไปตามลำดับการติดตั้ง Audi A6 C7 จริงที่ใช้ใน เอกสารการติดตั้ง iKAGOO ที่มีอยู่ เส้นทางการถอดแผงจริง ที่แสดงที่นี่ใช้สำหรับ Audi A6 C7 อย่าสันนิษฐานว่า Audi A7 ทุกคัน หรือ แดชบอร์ดทุกตัวในตระกูล C7 ใช้ลำดับการถอดแผงเหมือนกันทุกประการ.
เส้นทางยานพาหนะ
- Audi A6 C7
- ปีรุ่น 2012–2018
- การถอดมาตรวัดดั้งเดิม
- เส้นทางการถ่ายโอนชิ้นส่วนภายในเฉพาะรถ
งานที่เกี่ยวข้อง
- การถอดแผงบริเวณมาตรวัด
- การถอดมาตรวัดเดิม
- การถอดชิ้นส่วนบนแท่นทดสอบ
- การถ่ายโอนชิ้นส่วนดั้งเดิมที่จำเป็น
- การเชื่อมต่อใหม่และการทดสอบขั้นสุดท้าย
ไม่ครอบคลุมที่นี่
- การแก้ไขเลขไมล์
- ขั้นตอนการเขียนโค้ดที่ไม่รองรับ
- การดัดแปลงอิมโมบิไลเซอร์
- การวินิจฉัยข้อบกพร่องของรถที่ไม่เกี่ยวข้อง
เตรียมรถและโต๊ะทำงานก่อนถอดเรือนมาตรวัด
อย่าเริ่มต้นด้วยการดึงแผงตกแต่งแดชบอร์ด เตรียมรถ เครื่องมือ และพื้นที่ทำงานที่สะอาดก่อน เรือนมาตรวัดเดิมจะถูกเปิดระหว่างการติดตั้งนี้ ดังนั้นการปกป้องทั้งแดชบอร์ดและชิ้นส่วนอิเล็กทรอนิกส์จึงเป็นสิ่งสำคัญ.
การเตรียมรถ
- ตรวจสอบว่ารถตรงกับเส้นทาง Audi A6 C7 ที่แสดงไว้ที่นี่.
- ถ่ายภาพแดชบอร์ดทั้งหมดและเรือนมาตรวัดเดิม.
- ปรับพวงมาลัยเพื่อสร้างพื้นที่ทำงานรอบเรือนมาตรวัด.
- ปกป้องพื้นผิวแดชบอร์ดและแผงตกแต่งที่มองเห็นได้.
เครื่องมือและโต๊ะทำงาน
- ใช้เครื่องมือตกแต่งภายในพลาสติกที่ไม่ทำให้เกิดรอย.
- เตรียมโต๊ะทำงานที่สะอาดและปูรองก่อนถอดเรือนมาตรวัด.
- เก็บสกรูและคลิปให้เป็นระเบียบระหว่างการถอด.
- เก็บชิ้นส่วนเรือนมาตรวัดเดิมทุกชิ้นไว้หลังการติดตั้ง.
การป้องกันอิเล็กทรอนิกส์
- คายประจุไฟฟ้าสถิตก่อนสัมผัสแผงวงจรที่เปิดเผย.
- จับ PCB ที่ขอบ.
- อย่าใช้หน้าจอ LCD เป็นจุดกดทับ.
- ตรวจสอบแผงวงจรและขั้วต่อทุกชิ้นที่เก็บไว้ก่อนปิดตัวเรือน.
สำคัญ: หากผู้ติดตั้งไม่มีประสบการณ์กับอุปกรณ์อิเล็กทรอนิกส์ยานยนต์ที่เปิดเผย ควรให้ช่างอิเล็กทรอนิกส์ยานยนต์ที่มีประสบการณ์ดำเนินการขั้นตอนการถ่ายโอนบนโต๊ะทำงาน อย่าทดลองกับ PCB ของเรือนมาตรวัดเดิม.
บันทึกเรือนมาตรวัดเดิมก่อนถอดสิ่งใด
นี่คือขั้นตอนการติดตั้งจริงขั้นตอนแรก เรือนมาตรวัดเดิมคือค่าอ้างอิงพื้นฐานของคุณ บันทึกสภาพของมันขณะที่ยังติดตั้งและทำงานอยู่ เพื่อไม่ให้คำเตือนที่มีอยู่เดิมของรถถูกเข้าใจผิดว่าเป็นปัญหาจากการติดตั้งในภายหลัง.
บันทึกค่าอ้างอิงพื้นฐานนี้ให้ครบถ้วน
- เปิดเรือนมาตรวัดเดิมและถ่ายภาพด้านหน้าให้ชัดเจน.
- บันทึกเลขระยะทางที่แสดง.
- บันทึกระดับน้ำมันเชื้อเพลิงที่แสดง.
- ถ่ายภาพไฟเตือนและข้อความแจ้งเตือนที่มีอยู่ทั้งหมด.
- บันทึกการตั้งค่าภาษาและหน่วยที่มีให้เลือกตามความเหมาะสม.
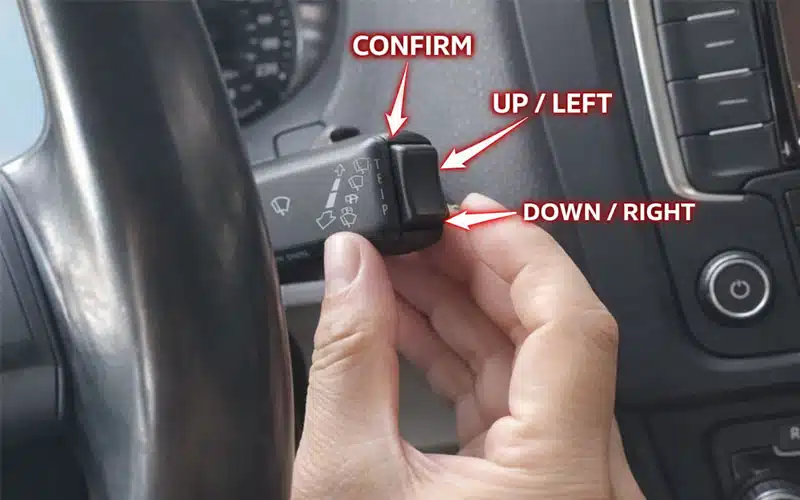
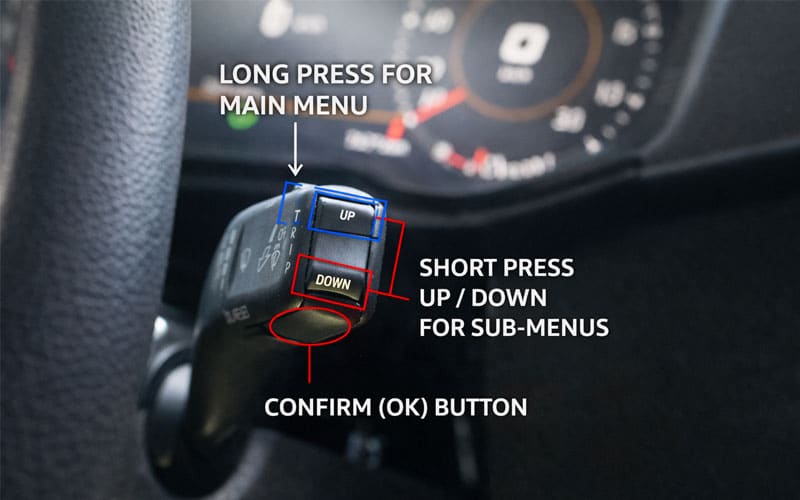
- ตรวจสอบว่าการป้อนข้อมูลควบคุมเมนูเดิมทำงานได้ก่อนถอด.
- เก็บภาพเหล่านี้ไว้จนกว่าการเปรียบเทียบหลังการติดตั้งครั้งสุดท้ายจะเสร็จสมบูรณ์.
อ้างอิงการตั้งค่าเตือนและเมนู
ทบทวนข้อมูลอ้างอิงนี้ก่อนการถอดชิ้นส่วน ใช้เพื่อทำความเข้าใจว่าการตั้งค่าที่มองเห็นและพฤติกรรมการเตือนใดที่ควรบันทึกไว้ก่อนถอดเรือนมาตรวัดเดิม เลย์เอาต์เมนูอาจแตกต่างกันตามเวอร์ชันฮาร์ดแวร์และซอฟต์แวร์.
อย่าคัดลอกการตั้งค่าโดยไม่ตรวจสอบ: วิดีโออ้างอิงไม่ได้พิสูจน์ว่าซอฟต์แวร์คลัสเตอร์ที่จัดส่งทุกรุ่น มีเส้นทางเมนูที่เหมือนกันทุกประการ โปรดใช้ปุ่มควบคุมที่ตรงกับ หน่วยที่ติดตั้งจริง.
ลำดับการติดตั้ง Audi A6 C7 โดยสรุป
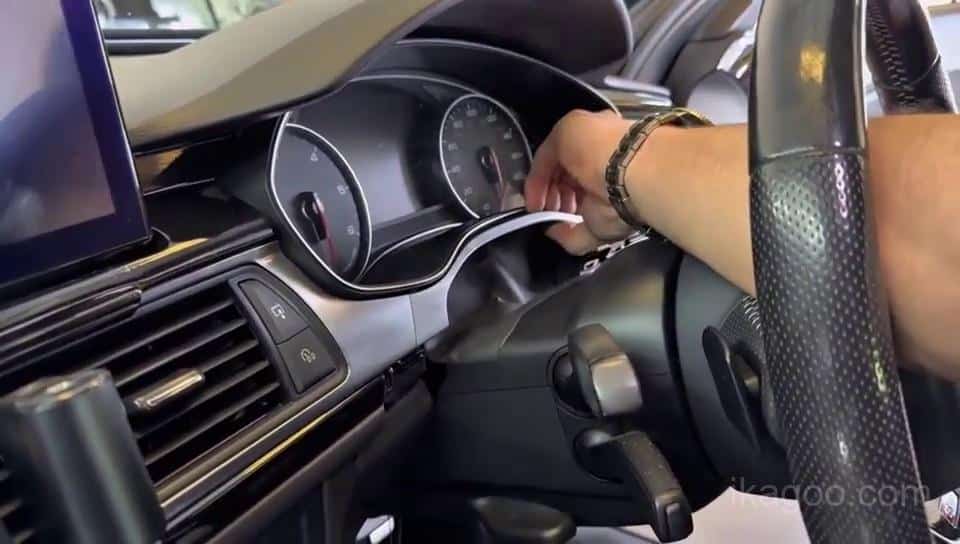
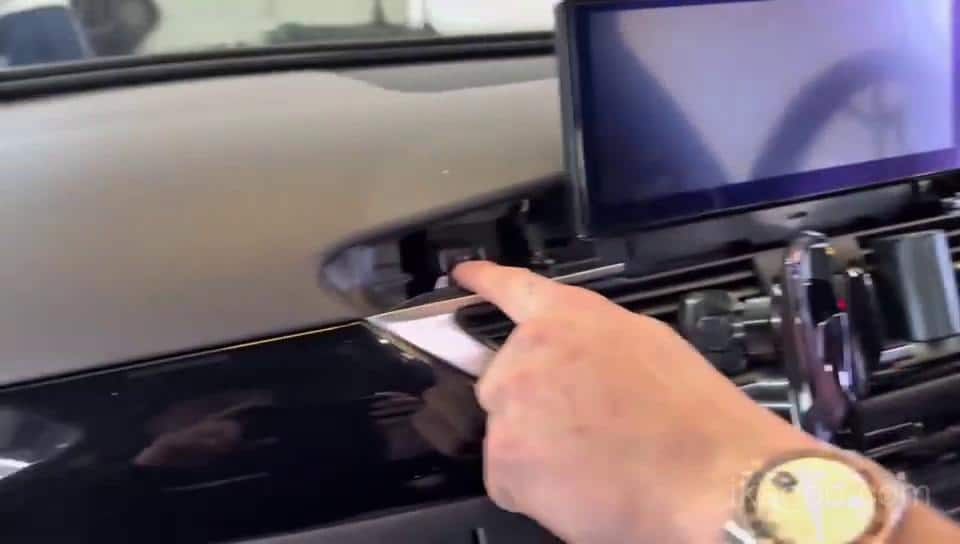
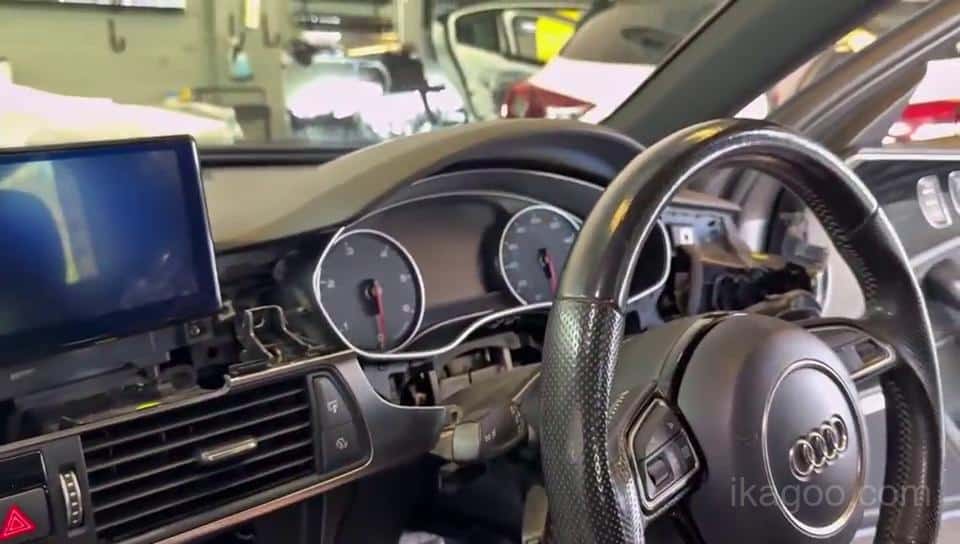
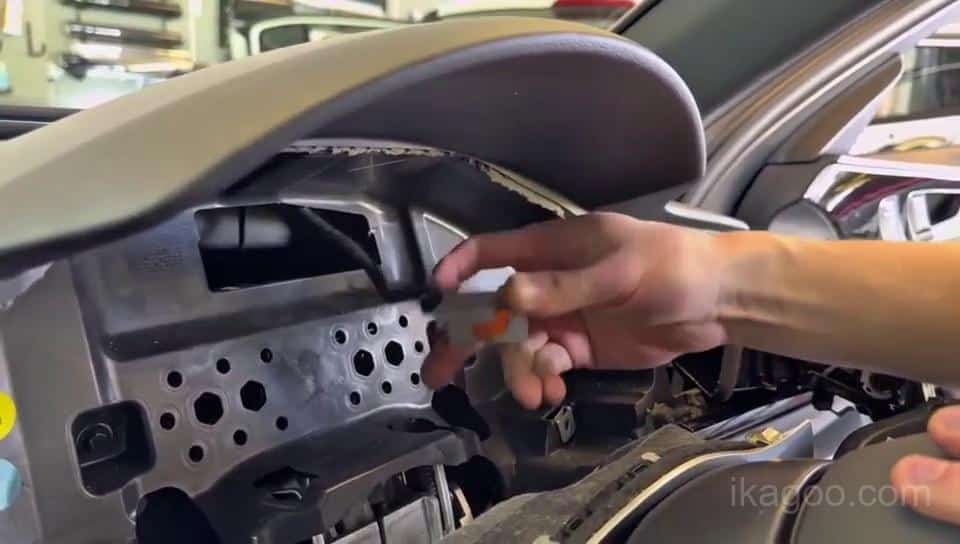
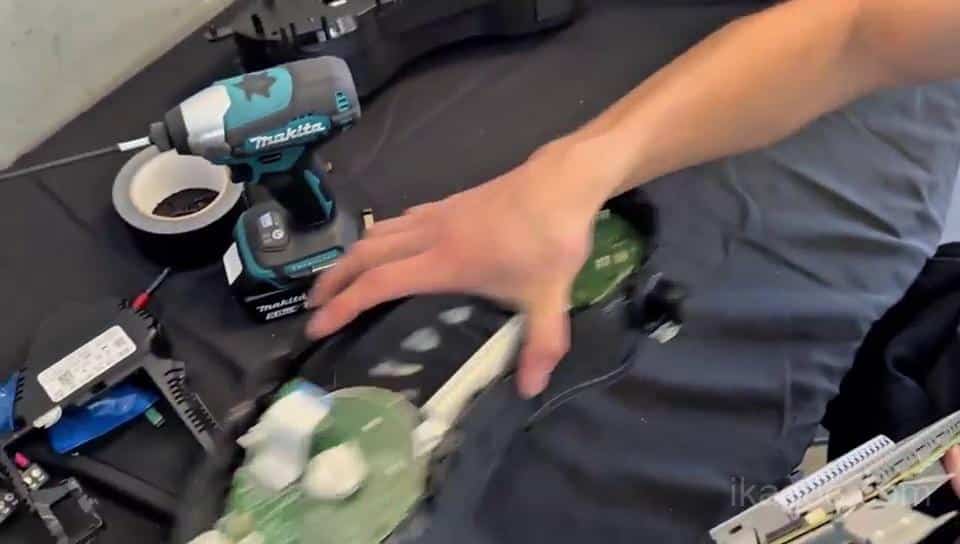
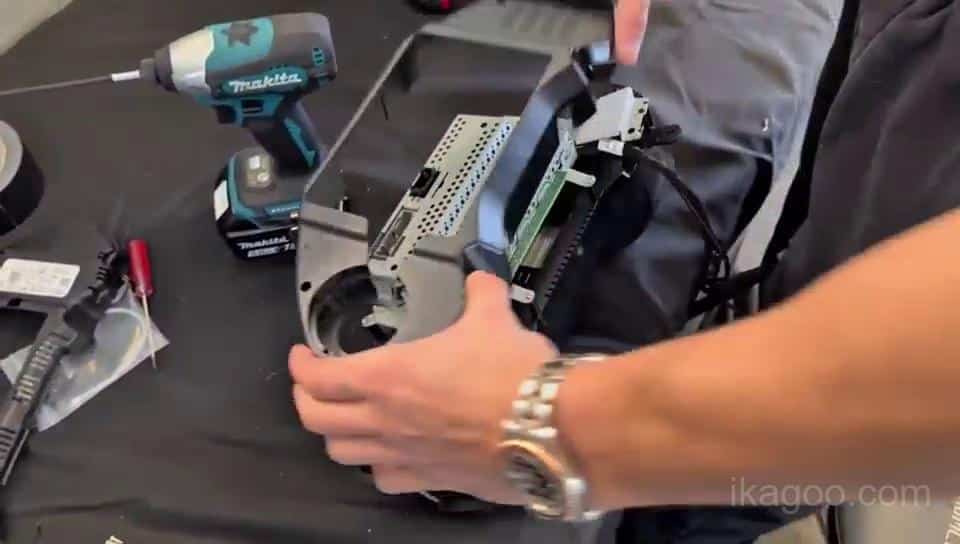
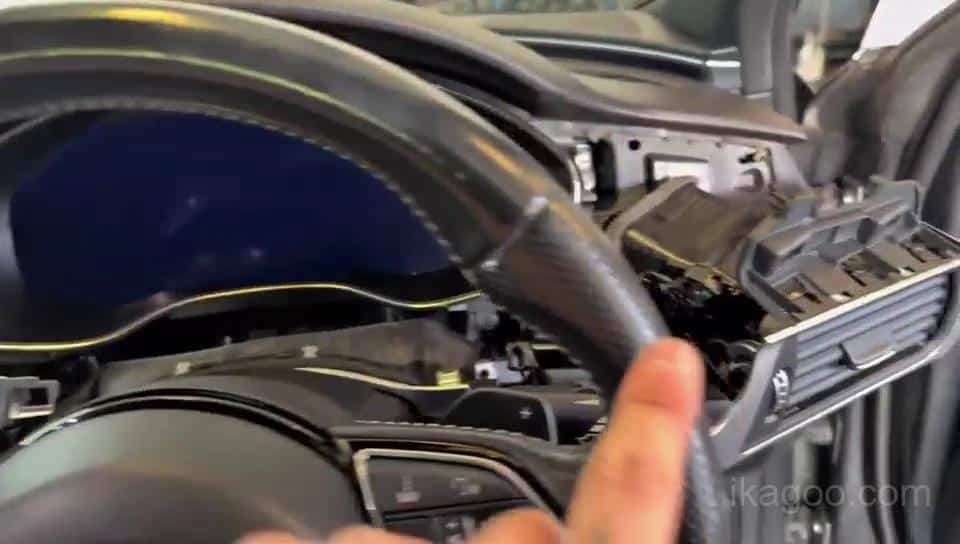
ฟุตเทจการติดตั้ง iKAGOO ที่มีอยู่เป็นไปตามลำดับด้านล่าง เฟรมเหล่านี้ถ่ายจากเส้นทางการติดตั้งจริงและถูกนำมาแสดง อีกครั้งภายในขั้นตอนการติดตั้งที่ตรงกันด้านล่างของหน้า.
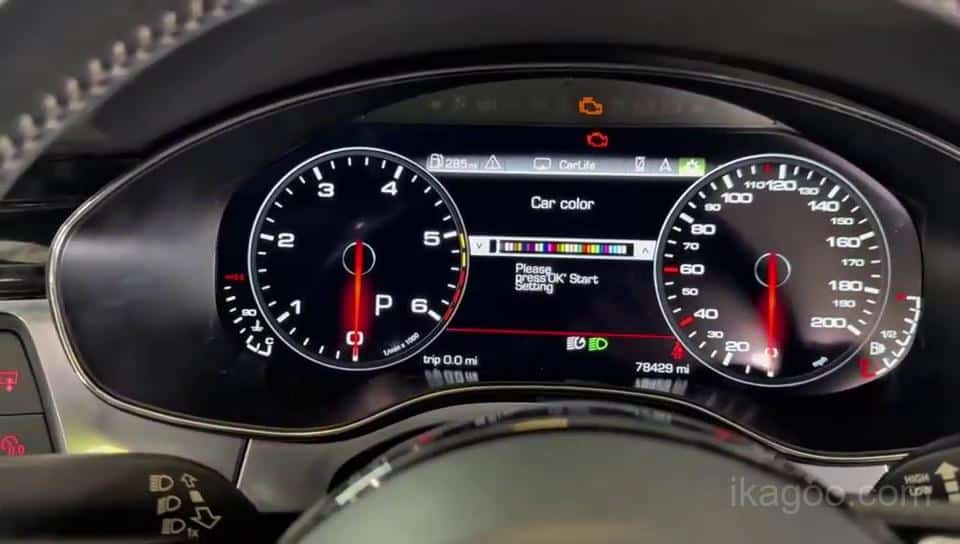
วิธีติดตั้งมาตรวัดดิจิทัล Audi A6 C7
ทำขั้นตอนเหล่านี้ให้ครบตามลำดับ อย่าติดตั้งแผงตกแต่งแดชบอร์ดกลับเข้าที่ทั้งหมด จนกว่าคลัสเตอร์ที่อัปเกรดจะเปิดทำงานและผ่านการเปรียบเทียบขั้นสุดท้าย กับบันทึกคลัสเตอร์เดิม.
ปลดแผงตกแต่งคลัสเตอร์เครื่องมือวัดส่วนล่าง
เริ่มบริเวณคลัสเตอร์เครื่องมือวัดส่วนล่างและคอพวงมาลัย สร้างช่องว่างให้เพียงพอเพื่อให้ปลดแผงตกแต่งโดยรอบได้โดยไม่ งอแผง.
- ยืนยันว่าบันทึกพื้นฐานขั้นตอนที่ 0 ถูกบันทึกไว้แล้ว.
- ปรับพวงมาลัยเพื่อให้มีพื้นที่ทำงาน.
- เริ่มจากแผงตกแต่งคลัสเตอร์ส่วนล่างที่แสดงในภาพการติดตั้ง.
- ปลดคลิปทีละจุดแทนการดึงแผงทั้งหมดในครั้งเดียว.
- ใช้เครื่องมือพลาสติกสำหรับแผงตกแต่งแทนเครื่องมือโลหะเปลือยบนพื้นผิวที่มองเห็น.
เปิดเส้นทางแผงตกแต่งแดชบอร์ดรอบคลัสเตอร์
ปลดแผงตกแต่งแดชบอร์ดต่อไปจนกระทั่งเข้าถึง บริเวณยึดคลัสเตอร์เครื่องมือวัดเดิมได้.
- เปิดแผงตกแต่งรอบคลัสเตอร์เครื่องมือวัดต่อไป.
- ปลดแผงตกแต่งช่องระบายอากาศกลาง / แดชบอร์ดแบบยาวที่แสดงในฟุตเทจ.
- รองรับชิ้นส่วนแผงตกแต่งที่ถอดออกแทนการปล่อยให้ห้อย.
- อย่าพยายามดึงคลัสเตอร์ออกจนกว่าบริเวณยึดจะถูกเปิดเผย.
ถอดคลัสเตอร์เครื่องมือวัด Audi A6 C7 เดิม
ดึงคลัสเตอร์เครื่องมือวัดเดิมออกมาข้างหน้าเฉพาะหลังจาก ปลดแผงตกแต่งโดยรอบที่กีดขวางแล้ว.
- รองรับคลัสเตอร์ขณะเคลื่อนออกมาข้างหน้า.
- เข้าถึงขั้วต่อด้านหลังโดยไม่ดึงสายไฟ.
- ปลดขั้วต่อผ่านกลไกการล็อกปกติของมัน.
- อย่าปล่อยให้คลัสเตอร์เดิมห้อยลงมาจากสายเคเบิล.
- ย้ายคลัสเตอร์ไปยังโต๊ะทำงานที่สะอาดและปูรองโดยตรง.
เปิดคลัสเตอร์เครื่องมือวัดเดิมบนโต๊ะทำงาน
ตอนนี้คลัสเตอร์เครื่องมือวัดเดิมจำเป็นต้องถูกเปิดออกเพื่อให้สามารถระบุ ชิ้นส่วนเฉพาะรถที่จำเป็นสำหรับการติดตั้งเพิ่มเติมได้.
- วางคลัสเตอร์เดิมบนพื้นผิวที่สะอาดและปูรอง.
- เก็บสกรูและคลิปให้เป็นระเบียบขณะเปิดฝาครอบ.
- ปกป้องเลนส์เดิมและพื้นผิวหน้าจอที่มองเห็นได้.
- อย่าสัมผัสชิ้นส่วน PCB โดยไม่จำเป็น.
- ถ่ายภาพการจัดเรียงภายในเดิมก่อนย้ายสิ่งใด.
การป้องกันไฟฟ้าสถิต: แผงวงจรของคลัสเตอร์เครื่องมือวัดที่เปิดออกเป็นชิ้นส่วนอิเล็กทรอนิกส์ที่ไวต่อการรบกวน จับแผงวงจรที่ขอบและหลีกเลี่ยงการปล่อยไฟฟ้าสถิต.
ย้ายชิ้นส่วนภายในเดิมที่จำเป็น
นี่คือขั้นตอนทางเทคนิคที่สำคัญที่สุดของการติดตั้งคลัสเตอร์เครื่องมือวัดดิจิทัล สำหรับ Audi A6 C7 การติดตั้งที่บันทึกไว้ เก็บรักษาชิ้นส่วนอิเล็กทรอนิกส์เดิมที่จำเป็นไว้ภายในโครงสร้าง คลัสเตอร์ที่อัปเกรดแล้ว.
- ระบุแผงวงจรที่ต้องเก็บรักษาไว้ก่อนถอดออก.
- บันทึกทิศทางขั้วต่อเดิมและตำแหน่งการติดตั้ง.
- ย้ายเฉพาะชิ้นส่วนที่จำเป็นตามเวอร์ชันคลัสเตอร์ที่จับคู่.
- เก็บเส้นทางเสียงกริ่ง / เสียงเตือนเดิมไว้อย่างถูกต้อง.
- ตรวจสอบว่าแผงวงจรที่ย้ายมาวางราบเรียบ.
- ตรวจสอบขั้วต่อทุกตัวก่อนปิดฝาครอบ.
- ตรวจสอบให้แน่ใจว่าสายริบบอนและสายไฟไม่ถูกหนีบ.
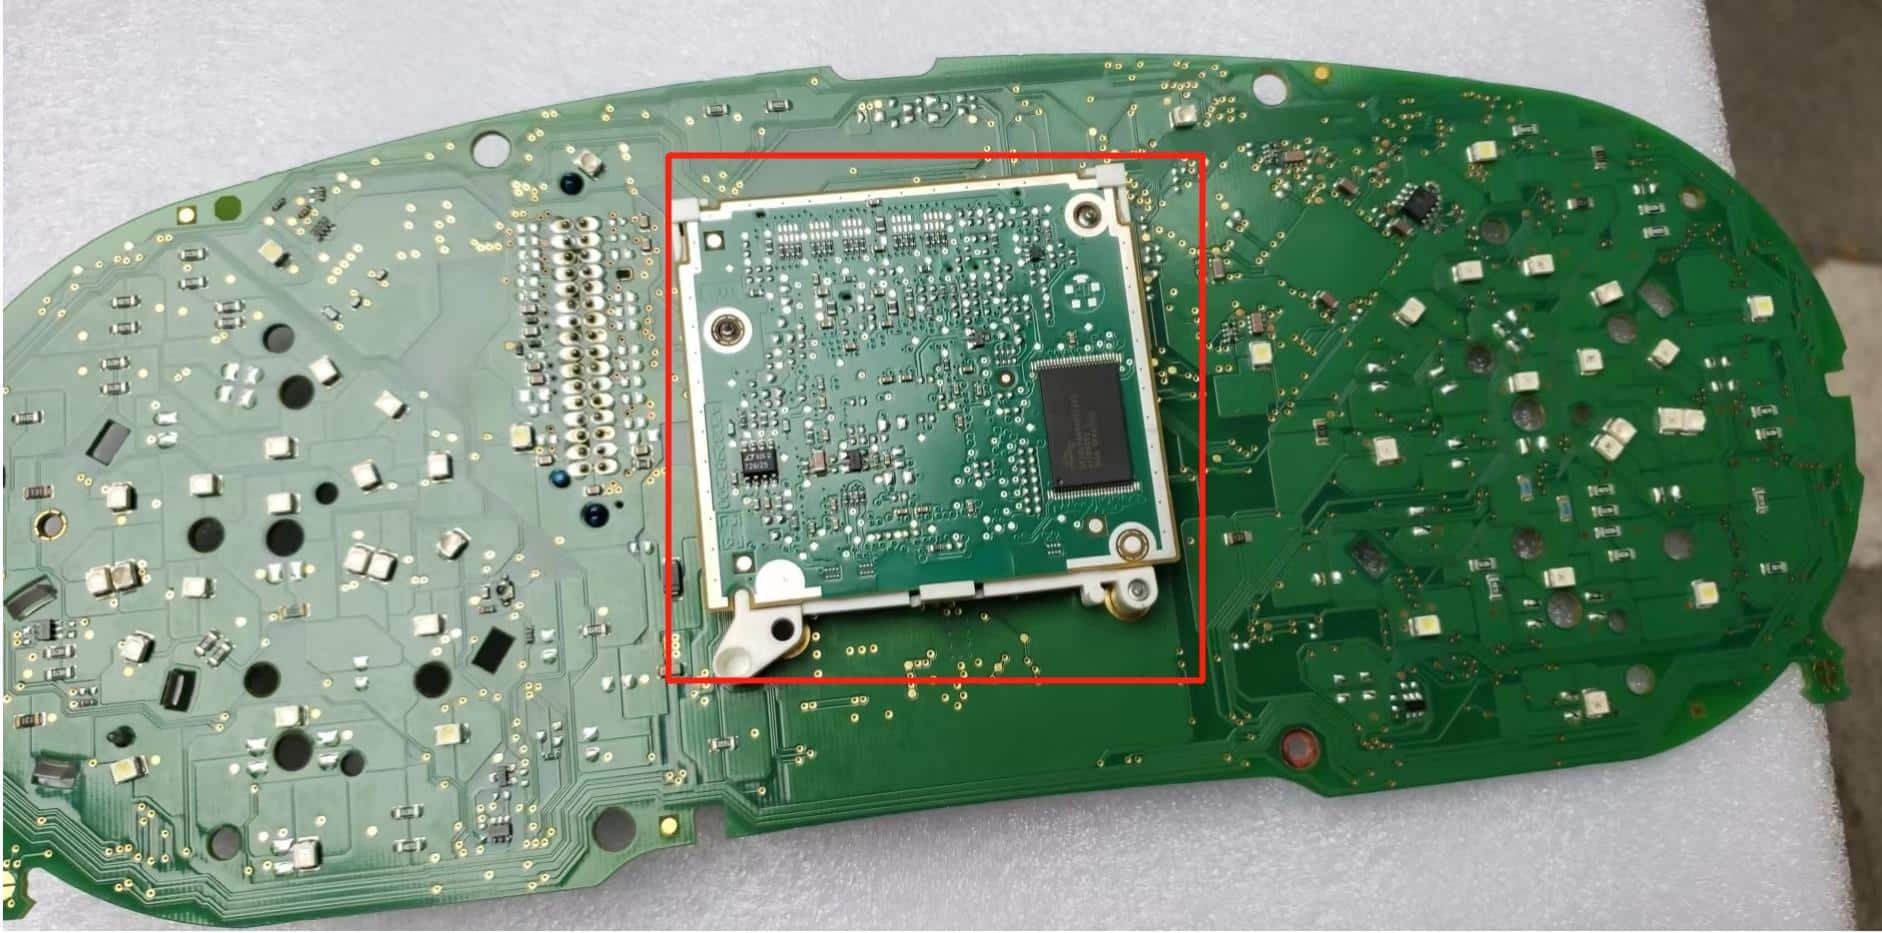
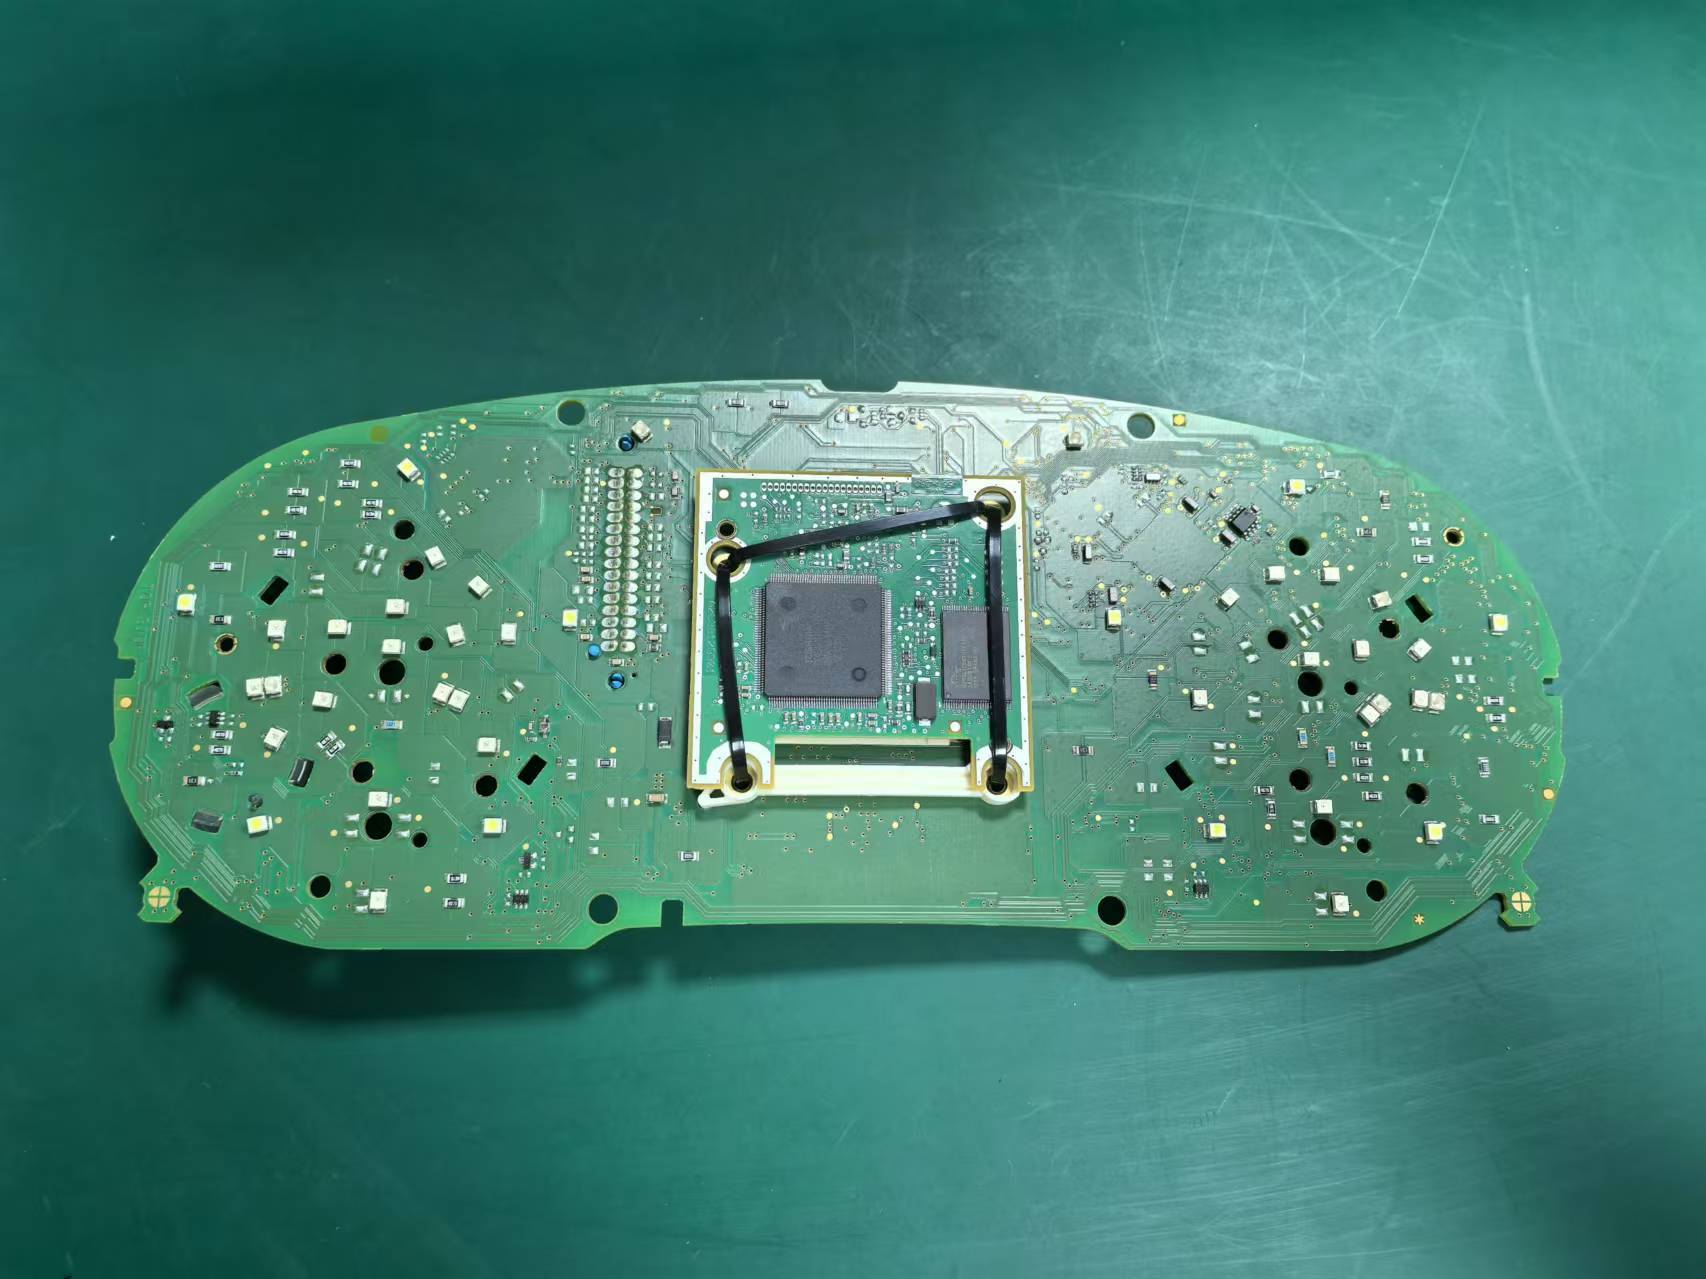
ฮาร์ดแวร์ภายในคลัสเตอร์ A6 C7 เดิมอาจแตกต่างกัน
อย่าสันนิษฐานว่าคลัสเตอร์เดิมของ Audi A6 C7 ทุกลูกมี การจัดวาง PCB ที่เหมือนกัน เปรียบเทียบฮาร์ดแวร์เดิมของลูกค้ากับ เอกสารอ้างอิงที่เกี่ยวข้องก่อนย้ายชิ้นส่วนใด.
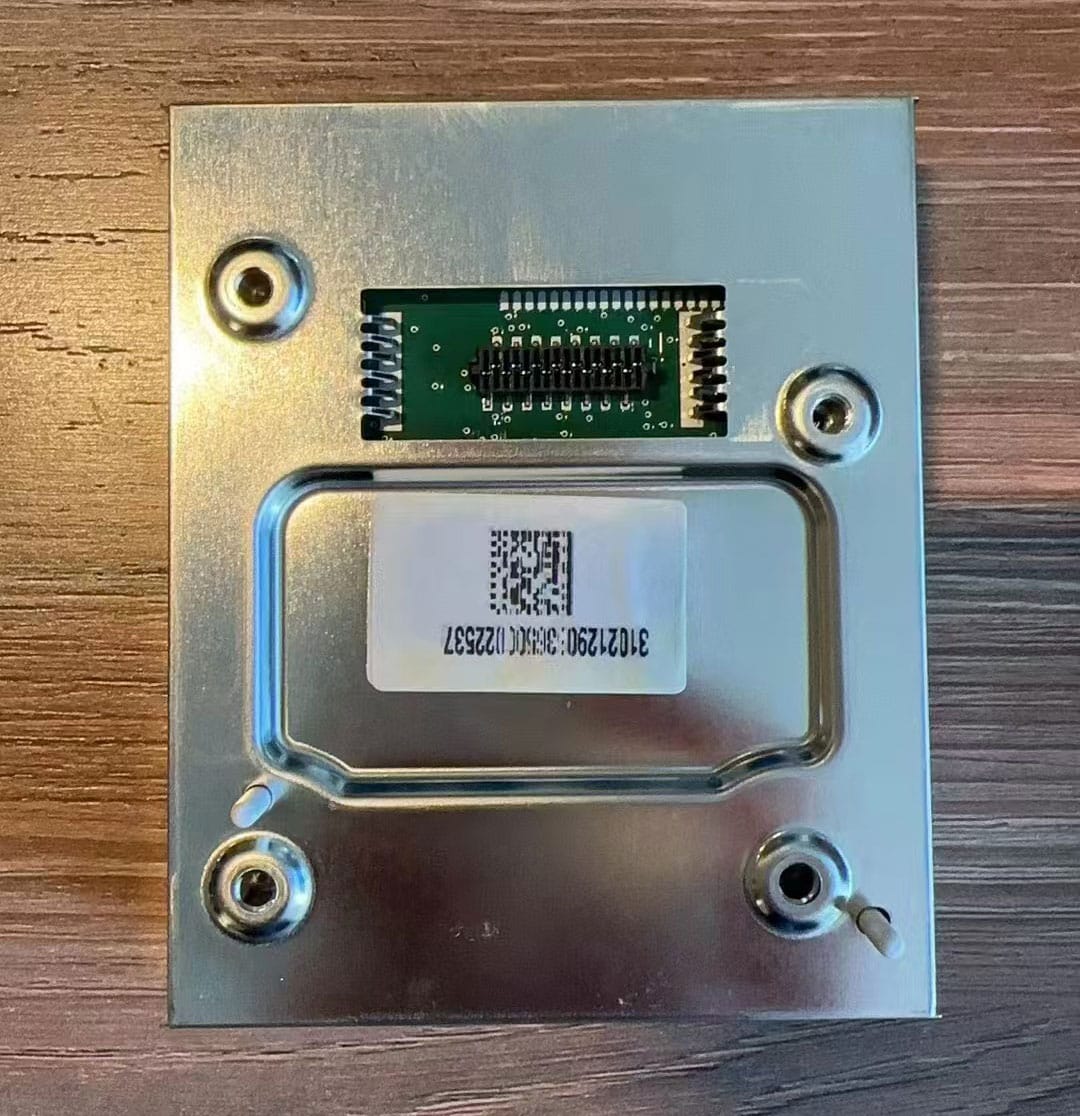
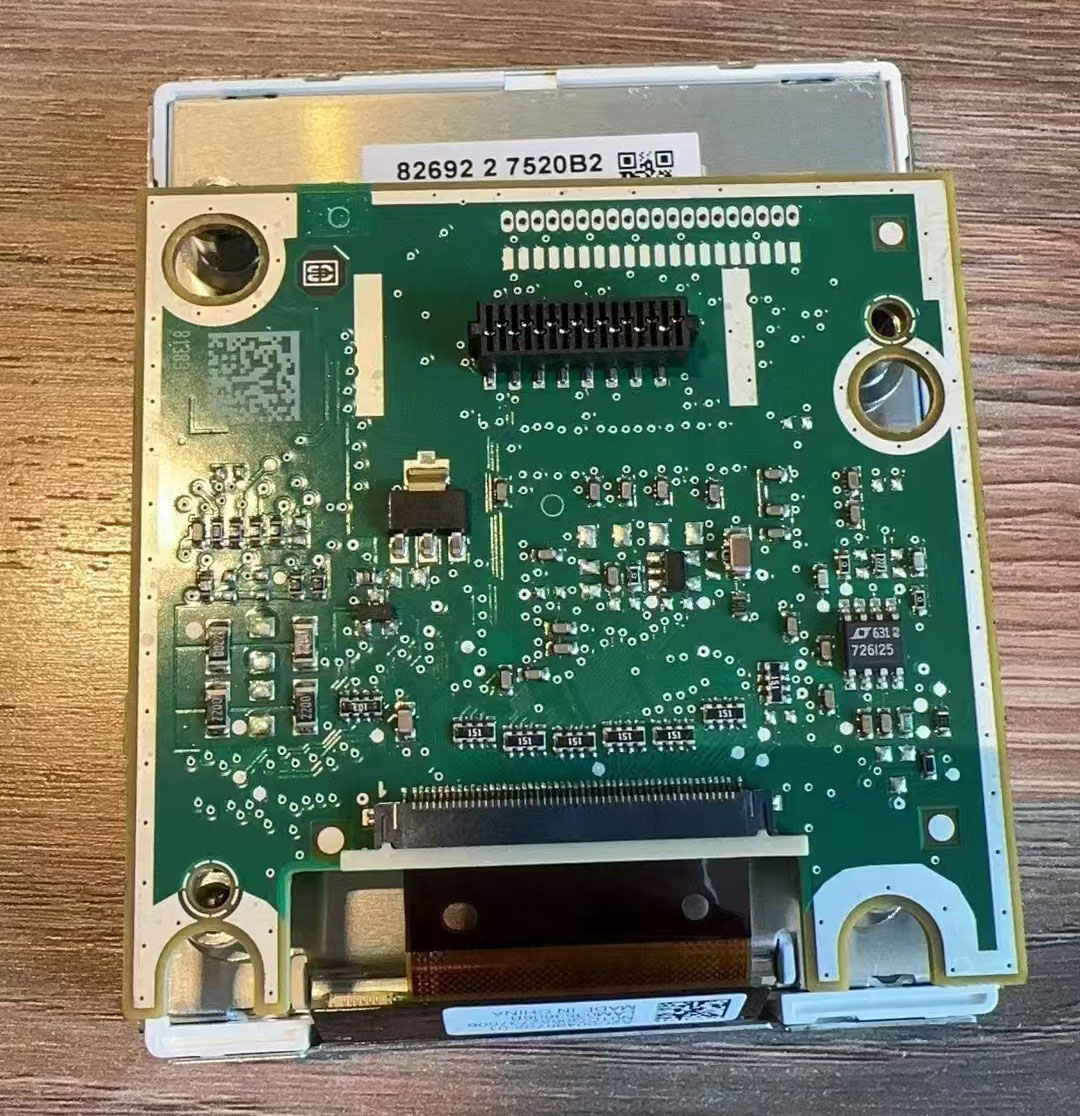
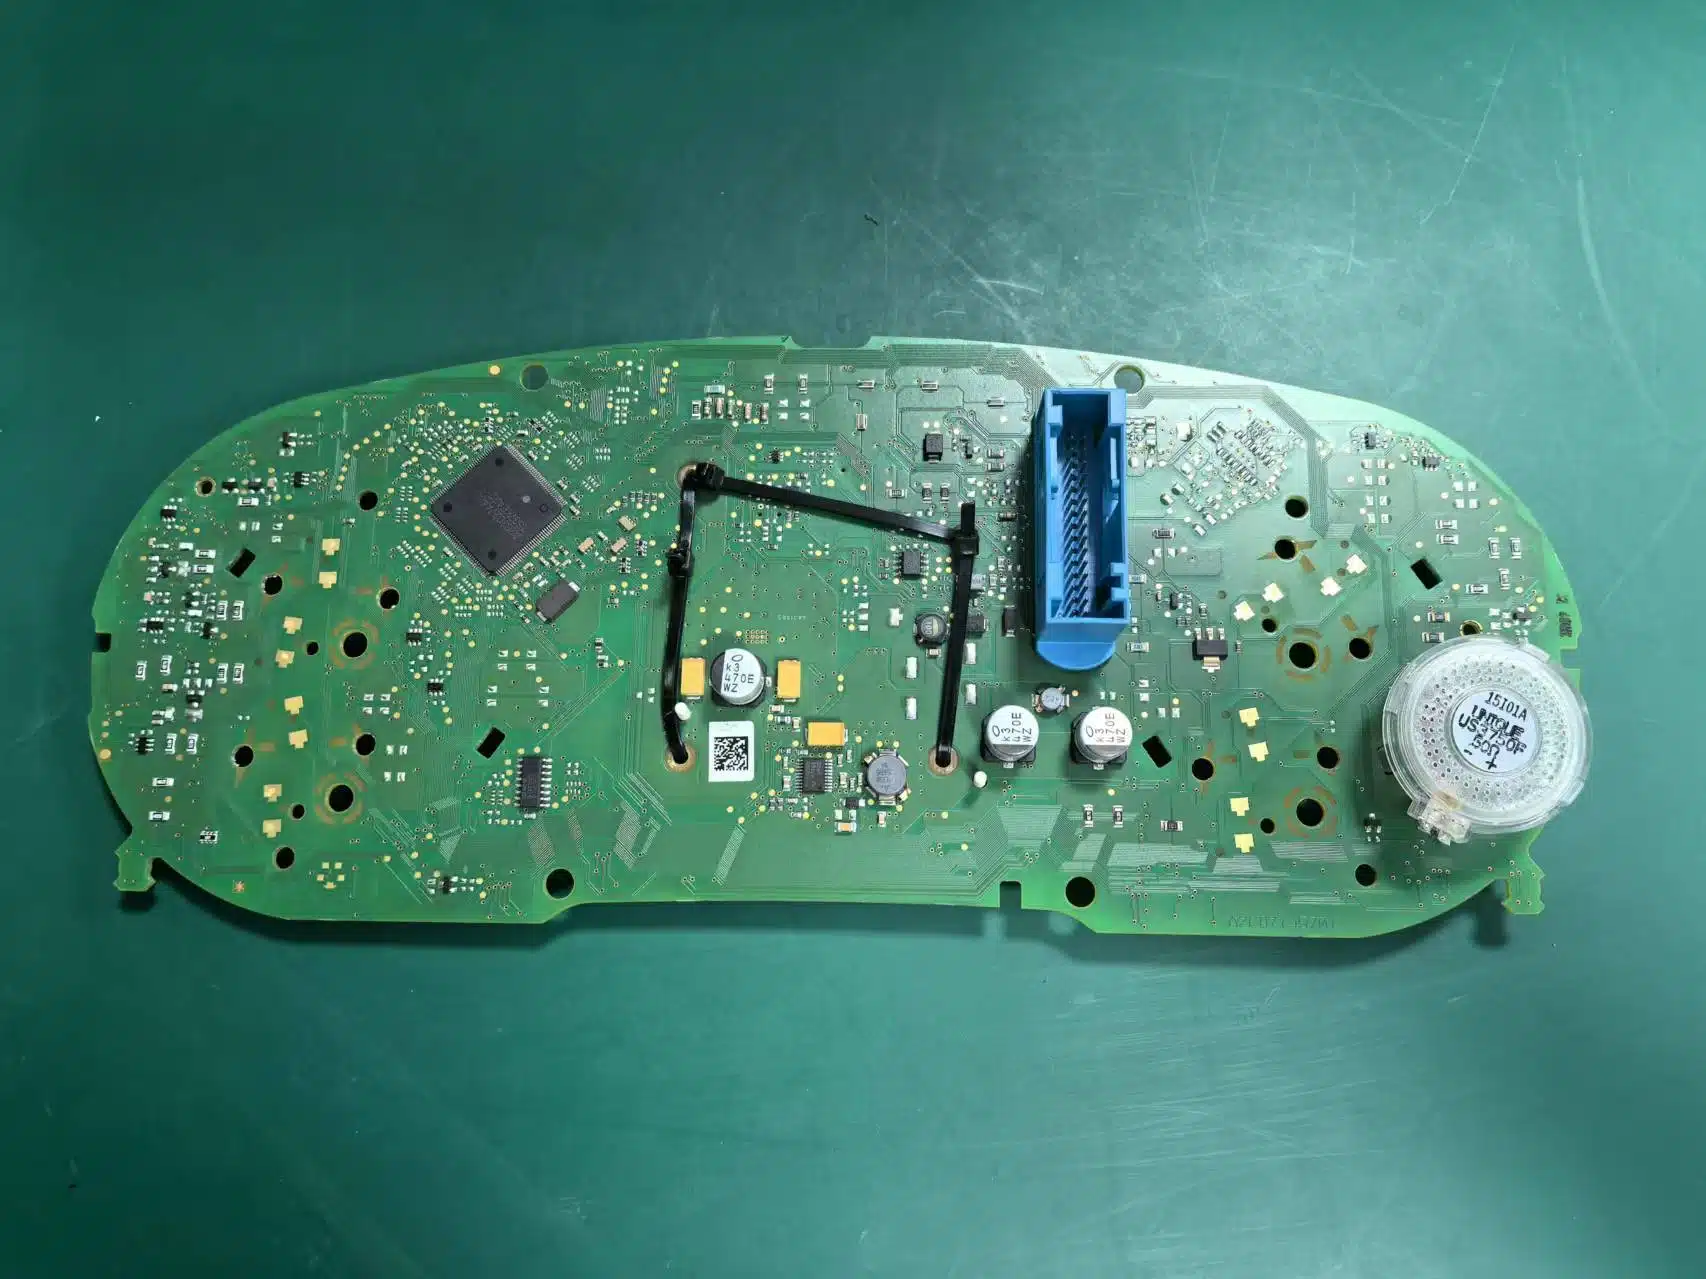
คณะกรรมการที่ปรึกษา
ตรวจสอบส่วนการจัดการแผงวงจรบริเวณ 02:43 ยืนยันตำแหน่งแผงวงจร และทิศทางของขั้วต่อก่อนถ่ายโอน.
อ้างอิงการย้ายบนแท่น
ตรวจสอบการจัดการภายในบริเวณ 04:32 ตรวจสอบชิ้นส่วนที่เก็บรักษาไว้ และการเสียบขั้วต่อให้แน่นก่อนปิดฝาครอบที่อัปเกรดแล้ว.
หากคลัสเตอร์ใหม่เริ่มทำงานแต่ข้อมูลรถหรือพฤติกรรมการเตือน ผิดปกติ: ให้ตรวจสอบการถ่ายโอนชิ้นส่วนต้นฉบับ การเสียบขั้วต่อ และ เส้นทางที่เกี่ยวข้องกับบัซเซอร์อีกครั้ง ก่อนสันนิษฐานว่าจอ LCD ชำรุด.
ปิดฝาครอบคลัสเตอร์ LCD ใหม่
ทำการตรวจสอบภายในครั้งสุดท้ายก่อนปิดฝาครอบ คลัสเตอร์ที่อัปเกรดแล้ว.
- ยืนยันว่าชิ้นส่วนที่เก็บรักษาไว้ทุกชิ้นอยู่ในตำแหน่งที่ถูกต้อง.
- ตรวจสอบการเสียบขั้วต่อให้แน่น.
- ตรวจสอบส่วนที่เกี่ยวข้องกับบัซเซอร์ / เสียงเตือน.
- ยืนยันว่าไม่มีสายริบบอนหรือสายไฟถูกหนีบ.
- จัดฝาครอบให้ตรงกันสม่ำเสมอก่อนปิด.
- ห้ามกดที่หน้าจอ LCD เพื่อบังคับให้ฝาครอบประกบกัน.
เชื่อมต่อคลัสเตอร์ดิจิทัลกลับคืนและทดสอบก่อนปิดชิ้นส่วนตกแต่ง
เชื่อมต่อคลัสเตอร์ที่ประกอบเสร็จแล้วกลับผ่านเส้นทาง การเชื่อมต่อเดิมของรถ อย่าปิดชิ้นส่วนตกแต่งแดชบอร์ดทั้งหมดทันที.
- เชื่อมต่อมาตรวัดความเร็วกลับคืนอย่างถูกต้อง.
- จัดวางให้อยู่ในตำแหน่งบนแดชบอร์ด.
- เว้นช่องว่างให้เพียงพอต่อการเปิดพื้นที่คลัสเตอร์อีกครั้งหากจำเป็น.
- เปิดสวิตช์รถ.
- ยืนยันว่าจอแสดงผลเริ่มทำงานตามปกติ.
- ดำเนินการเปรียบเทียบครั้งสุดท้ายก่อนปิดชิ้นส่วนตกแต่ง.
เปรียบเทียบคลัสเตอร์ใหม่กับบันทึกข้อมูลรถต้นฉบับ
หน้าจอเริ่มต้นที่สำเร็จเพียงอย่างเดียวไม่ได้หมายความว่าการติดตั้งเสร็จสมบูรณ์ เปรียบเทียบคลัสเตอร์ที่อัปเกรดแล้วกับรูปถ่ายและบันทึกที่บันทึกไว้ในขั้นตอนที่ 0 ขณะที่แดชบอร์ดยังสามารถเปิดได้ง่าย.
ตรวจสอบว่าจอแสดงผลเริ่มทำงานโดยไม่รีบูตซ้ำหรือหน้าจอว่างเปล่า.
ตรวจสอบการแสดงข้อมูลการขับขี่และข้อมูลรถยนต์ที่มีให้.
เปรียบเทียบคำเตือนที่มองเห็นได้กับรูปถ่ายต้นฉบับที่ถ่ายไว้ก่อนถอด.
ตรวจสอบว่าการเลื่อนเมนูและการเลือกที่รองรับตอบสนองอย่างถูกต้อง.
ตรวจสอบเส้นผิดปกติ ความเสียหายจากแรงกด หรือพื้นที่แสดงผลที่เสีย.
คลัสเตอร์มาตรวัดและขอบแดชบอร์ดควรเข้าที่โดยไม่ต้องออกแรงมากเกินไป.
ข้อมูลอ้างอิงการควบคุมเมนู
การตรวจสอบการแสดงผลและข้อมูลรถยนต์
ใช้ข้อมูลอ้างอิงนี้หลังการติดตั้งเพื่อตรวจสอบการทำงานของจอแสดงผลและ ข้อมูลรถยนต์ที่มีให้.
การตรวจสอบไฟแสดงสถานะและไฟเตือน
เปรียบเทียบพฤติกรรมไฟแสดงสถานะและไฟเตือนกับบันทึกต้นฉบับก่อนการติดตั้ง.
ระยะไมล์และขอบเขตข้อมูลรถยนต์: คู่มือการติดตั้งนี้ไม่มีคำแนะนำสำหรับการแก้ไข ระยะทางหรือแก้ไขข้อมูลรถยนต์ต้นฉบับ บันทึกการแสดงผลต้นฉบับ ก่อนถอดชิ้นส่วนและตรวจสอบผลลัพธ์หลังการติดตั้ง.
ตรวจสอบขั้นตอนการติดตั้งที่เกี่ยวข้องกับอาการอีกครั้ง
อย่าสรุปทันทีว่าคลัสเตอร์ LCD ใหม่ชำรุด เริ่มจากขั้นตอนการติดตั้งที่เกี่ยวข้องโดยตรงกับอาการมากที่สุด.
การอัปเดตเฟิร์มแวร์แยกจากการติดตั้งทางกายภาพ
หากคลัสเตอร์ดิจิทัล iKAGOO ของ Volkswagen หรือ Audi ที่รองรับต้องการ การอัปเดตเฟิร์มแวร์หลังจากเสร็จสิ้นการติดตั้งทางกายภาพ ให้ตรวจสอบเวอร์ชัน ซอฟต์แวร์ที่ติดตั้งไว้ก่อน และใช้เส้นทางการอัปเดตที่กำหนดให้กับฮาร์ดแวร์เวอร์ชันนั้น.
อย่าติดตั้งไฟล์เฟิร์มแวร์แบบสุ่ม. ฮาร์ดแวร์และซอฟต์แวร์เวอร์ชันของคลัสเตอร์ที่แตกต่างกันอาจต้องใช้ แพ็กเกจที่แตกต่างกัน ระบุเวอร์ชันที่ติดตั้งไว้ก่อน.
ต้องการคลัสเตอร์ดิจิทัล Audi A6 C7 ที่ใช้สำหรับเส้นทางการดัดแปลงนี้หรือไม่?
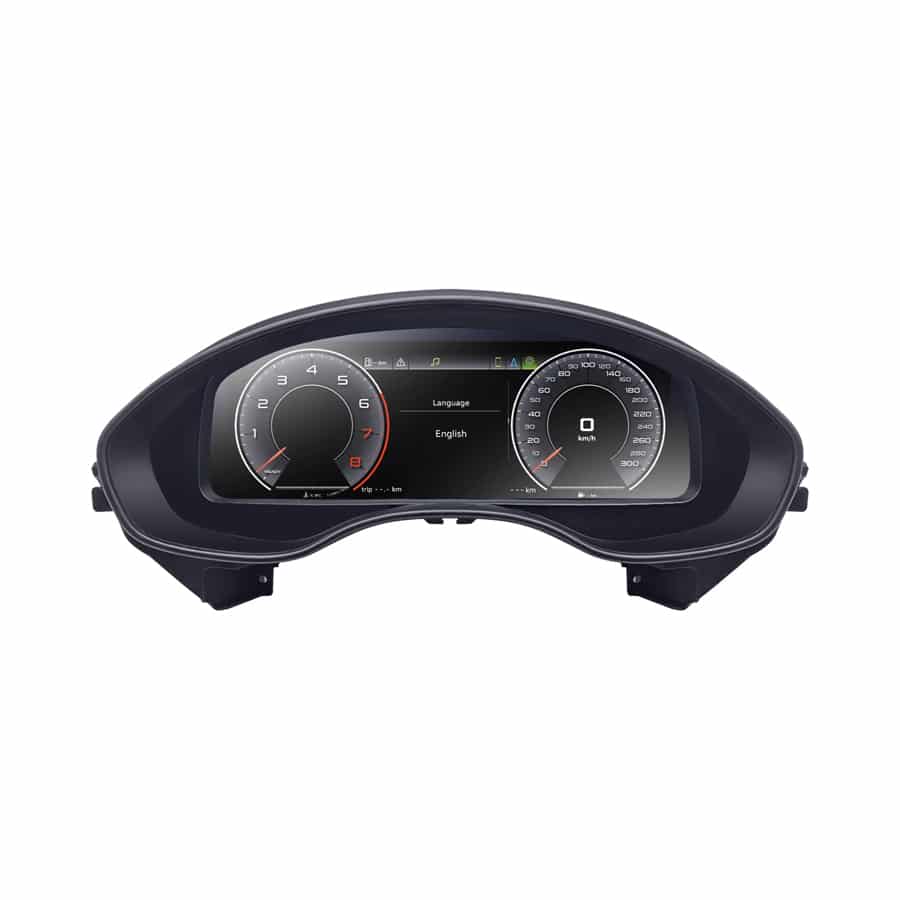
คลัสเตอร์ดิจิทัล 12.3 นิ้ว Audi A6 / A7 C7
ผลิตภัณฑ์ iKAGOO ที่เกี่ยวข้องคือคลัสเตอร์ดิจิทัลเฉพาะรุ่นรถ สำหรับการกำหนดค่า Audi A6 / A7 C7 ที่รองรับ บทแนะนำนี้ บันทึกเส้นทางการติดตั้งทางกายภาพของ Audi A6 C7 ที่แสดงไว้ด้านบน เจ้าของ Audi A7 ควรยืนยันแดชบอร์ดและคลัสเตอร์เดิมก่อน สั่งซื้อ เนื่องจากเส้นทางการถอดขอบอาจแตกต่างกัน.
ก่อนจัดส่ง ให้ยืนยันรถรุ่นที่แน่นอน ลักษณะคลัสเตอร์เดิม และการกำหนดค่าที่ร้องขอเมื่อจำเป็น เพื่อให้สามารถเตรียมเวอร์ชันที่ถูกต้องได้.
ความเข้ากันได้: ปีของรถเพียงอย่างเดียวไม่เพียงพอที่จะระบุความแตกต่างของคลัสเตอร์ เดิมทุกรูปแบบ ใช้แดชบอร์ดเดิมและลักษณะของคลัสเตอร์เครื่องมือวัด เป็นส่วนหนึ่งของการตรวจสอบความเข้ากันได้.
คำถามเกี่ยวกับการติดตั้งคลัสเตอร์ดิจิทัล Audi A6 C7
คู่มือการติดตั้งนี้ครอบคลุม Audi A6 ปีใดบ้าง?
หน้านี้บันทึกเส้นทางการติดตั้ง Audi A6 C7 ที่แสดงสำหรับ รถ 2012–2018 ควรยืนยันการกำหนดค่าเครื่องมือวัดเดิมที่แน่นอน ก่อนสั่งซื้อคลัสเตอร์ทดแทน.
คลัสเตอร์ดิจิทัล Audi A6 C7 เป็นแบบเสียบใช้งานได้ทันทีหรือไม่?
การดัดแปลงที่บันทึกไว้นี้ใช้เส้นทางการเชื่อมต่อของรถเดิม โดยไม่ตัดสายไฟโรงงานแบบทำลาย แต่ไม่ใช่การติดตั้ง ที่ไม่ต้องถอดชิ้นส่วนใดเลย ยังคงต้องมีการถอดขอบแดชบอร์ด ถอดคลัสเตอร์เดิม ถอดชิ้นส่วนบนแท่น ถ่ายโอนชิ้นส่วนภายใน และการ ทดสอบขั้นสุดท้าย.
คลัสเตอร์เครื่องมือวัดเดิมจำเป็นต้องเปิดออกหรือไม่?
ใช่ เส้นทาง Audi A6 C7 ที่บันทึกไว้รวมถึงการเปิดคลัสเตอร์ เครื่องมือวัดเดิมบนแท่น และเก็บรักษาชิ้นส่วนอิเล็กทรอนิกส์ เดิมที่จำเป็นไว้.
คลัสเตอร์ Audi A6 C7 ทุกรุ่นใช้ PCB ภายในเหมือนกันหรือไม่?
อย่าสันนิษฐานว่าเหมือนกัน เอกสารอ้างอิงที่มีอยู่แสดงให้เห็น การจัดเรียงภายในที่แตกต่างกัน ควรใช้คลัสเตอร์เดิมจริงของลูกค้า เป็นข้อมูลอ้างอิงฮาร์ดแวร์หลัก.
ทำไมฉันควรถ่ายภาพคลัสเตอร์เดิมก่อนการติดตั้ง?
ภาพถ่ายเดิมเป็นข้อมูลพื้นฐานสำหรับเลขไมล์ที่มองเห็นได้ ไฟเตือน การแจ้งเตือน ข้อมูลรถที่มีให้ และการทำงานของเมนู ซึ่งช่วยแยกแยะสภาพรถที่มีอยู่เดิมออกจากปัญหาจากการติดตั้ง.
ฉันควรตรวจสอบอะไรหากคลัสเตอร์ใหม่เปิดติดแต่ข้อมูลรถหายไป?
ตรวจสอบชิ้นส่วนเดิมที่เก็บรักษาไว้ การเสียบขั้วต่อ และ ขั้นตอนการถ่ายโอนภายในอีกครั้ง ก่อนสันนิษฐานว่าจอ LCD เองชำรุด.
ฉันควรตรวจสอบอะไรหากพฤติกรรมการเตือนเปลี่ยนไปหลังการติดตั้ง?
ก่อนอื่นให้เปรียบเทียบผลลัพธ์กับภาพถ่ายการเตือนก่อนการติดตั้ง จากนั้นตรวจสอบชิ้นส่วนภายในที่เก็บรักษาไว้และเส้นทางที่เกี่ยวข้อง กับเสียงเตือน / บัซเซอร์เดิม.
ควรติดตั้งแผงหน้าปัดกลับให้สมบูรณ์เมื่อใด?
เฉพาะหลังจากที่คลัสเตอร์ดิจิทัลเริ่มทำงานตามปกติแล้วเท่านั้น จึงจะตรวจสอบข้อมูลรถและตัวควบคุมเมนูที่มีให้ใช้งาน และนำผลลัพธ์ไปเปรียบเทียบกับบันทึกก่อนการติดตั้งต้นฉบับ.
ฉันควรเก็บคลัสเตอร์มาตรวัด Audi ต้นฉบับไว้หลังการติดตั้งหรือไม่?
ใช่ เก็บคลัสเตอร์ต้นฉบับที่สมบูรณ์และชิ้นส่วนต้นฉบับที่ถอดออกทั้งหมดไว้ ฮาร์ดแวร์ต้นฉบับยังคงเป็นข้อมูลอ้างอิงสำคัญสำหรับการแก้ไขปัญหาและการตรวจสอบความเข้ากันได้ในอนาคต.
สามารถอัปเดตเฟิร์มแวร์ได้ทันทีหลังการติดตั้งหรือไม่?
เฉพาะเมื่อจำเป็นต้องอัปเดตจริง ๆ และได้ระบุเวอร์ชันฮาร์ดแวร์และซอฟต์แวร์ที่ติดตั้งไว้แล้วเท่านั้น อย่าติดตั้งแพ็กเกจ USB แบบใดก็ได้จากคลัสเตอร์เวอร์ชันอื่น.
ฉันสามารถติดตั้งคลัสเตอร์ดิจิทัล Audi A6 C7 ได้ด้วยตัวเองหรือไม่?
ขั้นตอนการถอดแดชบอร์ดอาจจัดการได้สำหรับช่างติดตั้งที่มีประสบการณ์ แต่ชิ้นส่วนอิเล็กทรอนิกส์ของคลัสเตอร์มาตรวัดต้นฉบับจะถูกเปิดเผยในระหว่างขั้นตอนการถ่ายโอนบนแท่นทดสอบ หากคุณไม่มีประสบการณ์ด้านอิเล็กทรอนิกส์ยานยนต์ ควรใช้ช่างติดตั้งที่มีประสบการณ์สำหรับงานส่วนนั้น.
หมายเหตุการติดตั้ง: การเปลี่ยนแปลงการผลิตของรถ การดัดแปลงรถก่อนหน้า และรูปแบบคลัสเตอร์มาตรวัดต้นฉบับอาจส่งผลต่อขั้นตอนที่แน่นอน คู่มือนี้ใช้เส้นทางการติดตั้ง Audi A6 C7 ที่มีเอกสารระบุไว้ตามที่แสดงในวัสดุ iKAGOO ที่มีอยู่ หากฮาร์ดแวร์ต้นฉบับของลูกค้าแตกต่างจากข้อมูลอ้างอิง ให้หยุดและยืนยันเส้นทางที่ถูกต้องแทนการบังคับใช้ขั้นตอนเดียวกัน.








Add comment
คุณต้องเข้าสู่ระบบ เพื่อจะพิมพ์ความเห็น